Sunday, December 23, 2012

My Review of VIBRAM FIVEFINGERS Men's TrekSport

Originally submitted at Eastern Mountain Sports

With an emphasis on traction and performance, the FiveFingers TrekSport features a cleated 4 mm Vibram rubber outsole and a Coconut Active Carbon upper for natural breathability and abrasion resistance.


Five fingers will change your life.

By Captain Hitop from Poughkeepsie NY on 12/23/2012


5out of 5

Sizing: Feels true to size

Width: Feels too narrow

Pros: Comfortable, Durable, Lightweight

Cons: Not Water Resistant

Best Uses: Mixed Terrain, Grass, Around the house, Rocky/Unstable Terrain, At The Gym, Everyday, Paved Trails

Describe Yourself: Recreational Walker/Hiker, Survivalist

Was this a gift?: No

Vibram five fingers are by far the most comfortable shoe you will ever wear. I have been wearing these every day for about a year and I now own three pairs. They are really comfortable and lightweight. Humans are not built to wear shoes, so why wear something that is bulky and impedes natural movement? Ever since I started wearing these all my back problems have dissapeared. I feel less fatigued after walking and they are just flat out more comfortable. They can be a bit cold in the winter so I recommend buying a pair a size up to accomodate socks. My only complaint is that they no longer make this model in leather, and that they don't offer enough models in earth tones. Try them out, they will change your life.

Bailey, uninterested in my new footwear...

thumbnail

Tags: Using Product, Picture of Product

(legalese)

Tuesday, December 18, 2012

Tinder

Dry tinder is the first and most important ingredient in a fire. Building a fire is all about adding bigger and bigger pieces slowly until it can sustain itself. It all starts with a tiny ember, unless you're using gasoline that is. For most of my fires I use a farrow rod, and I have dozens of favorites for tinder. In this post I will outline a few of the best ones. One you can make, one that is plentiful in urban areas and two that can be found in the wild.

The first can be made at home or at the campsite, it's called charcloth. To make your own charcloth start with any cloth made of 100% cotton. Place it inside a tin that can be sealed, an Altoids tin works well, and puncture a small hole in the top with a knife. Place the tin in the coals of a fire and give it about five minutes, it should stay in until you can no longer see smoke coming from the hole. Remove the tin and once it's cool check the cloth. It should have turned totally black and be very delicate, ripping easily. The cotton has now turned to pure carbon and will take the tiniest spark. Keep it dry and it will light first try every time.

The second is simple steel wool, found at places like Home Depot or any automotive shop. Steel wool takes a spark easily and will glow red hot when blown on. Lighting it with a match works well too. Placing a 9 volt battery on the surface of the wool will also cause it to ignite.

Cattail is going to be the easiest to spot, everyone knows what they look like. Not only are they edible, but at this time of year they are great when gathered for tinder. By now they are all dried out and the normally densely packed seeds have now turned to a fluffy white mass. Simply place in the middle of your tinder bundle and drop in an ember. If they are still fresh and brown they can be dried for a few days after breaking them off the plant.

The fourth is a bit harder to find, It's called Chaga. Chaga is a fungus that grows exclusively on birch trees. Birch bark has an oil in it that is extremely flammable, and this fungus absorbs this oil. Birch bark itself is an excellent fire starter, but this stuff takes it to a whole other level. Once it takes a spark it's actually hard to put out. I carry a chunk with me in my bag at all times. To find it you want to look for a large black mass growing on a birch tree. When broken open, it's a reddish orange inside.


Wednesday, December 12, 2012

Maxpedition Fatboy Versipack


Those that know me have seen my "Survival Attache" before. When I first got into all this survival stuff I realized that in order to be prepared at all I would need more than what I could carry. So my approach has become somewhat akin to not keeping all my eggs in one basket. If I lose one cache of gear, I have another backup. The basic idea is to have everything you need to survive within your home. Then to have enough to survive till you get home within your vehicle, and enough to survive till you get to your vehicle on your person. Go bags are pretty easy, just imagine you're going on a camping trip with the possibility of being robbed or shot at. Now it is certainly not possible to carry all that crap around with you all day, but you can carry the basics. I won't go into everything I carry as I already did a blog post on that. ( It's not a purse, It's a "Survival Attache" )


What I want to talk about is my new bag, the Maxpedition Fatboy Versipack. I heard about these bags from an ad in a magazine, they looked pretty good so I did some research. The reviews were overall very good aside from the occasional complaint that it was too small. (I can see that complaint, it seems bigger in the picture. If you want something bigger they do make the jumbo model, which I haven't checked out yet. ) There are many options with these bags, for this model there is the regular one and the GTG. This is the standard one. (The video below illustrates the differences) So you will have to decide what suits your purposes best.

First impressions are, damn, this may be too small. After a few days though that feeling has passed. It really forces you to prioritize. So I am carrying a smaller water bottle, but all the other essentials I was able to fit after organizing a bit. The construction is very heavy duty and it is quite obvious this will outlast my off brand bag. With many pockets and compartments it makes excellent use of the limited space and has molle style webbing so it can be expanded if needed. The major selling point for me was the dedicated concealed carry pocket at the back. Any hook and loop (velcro) universal holster fits but you can get one right from them for about ten bucks. The bag being a bit small it wont accommodate my 1911, but the XD fits (barely) and my little Smith and Wesson is the perfect size. If you don't plan on using it for this purpose the back pocket would still come in handy.


My complaints are few, but they should be noted. The "cell phone pocket" is a joke. Even a bottom shelf free phone barely fits. You could never fit a smart phone in it. The GTG model has eliminated this pocket, and put molle webbing in its place. I wish this was the case for mine, but I decided the rear pocket with the molle and the magazine pocket was worth the sacrifice and went with this model. I do wish my 1911 would fit, but I didn't expect it to. I am not a fan of off body carry, and rarely do it. If anything I wanted options. Now if I'm just running out in shorts and a t-shirt I can sling the bag with the .38 in it and not worry about a bulky holster. It also gives me an option for a backup in the bag with a primary on my hip. My final complaint is that It's made in Taiwan. Now I am not one to avoid a product based on it's country of manufacture, I would just prefer it was made here. If it is a quality product, I will deal with it. Overall an incredibly comfortable and well made little bag. At 78$ it seems like a very good deal. The quality being way higher than many bags I've seen. The bag can be purchased through the Maxpedition website, but I found it a bit cheaper on Amazon.


Monday, October 22, 2012

Springfield Operator 1911

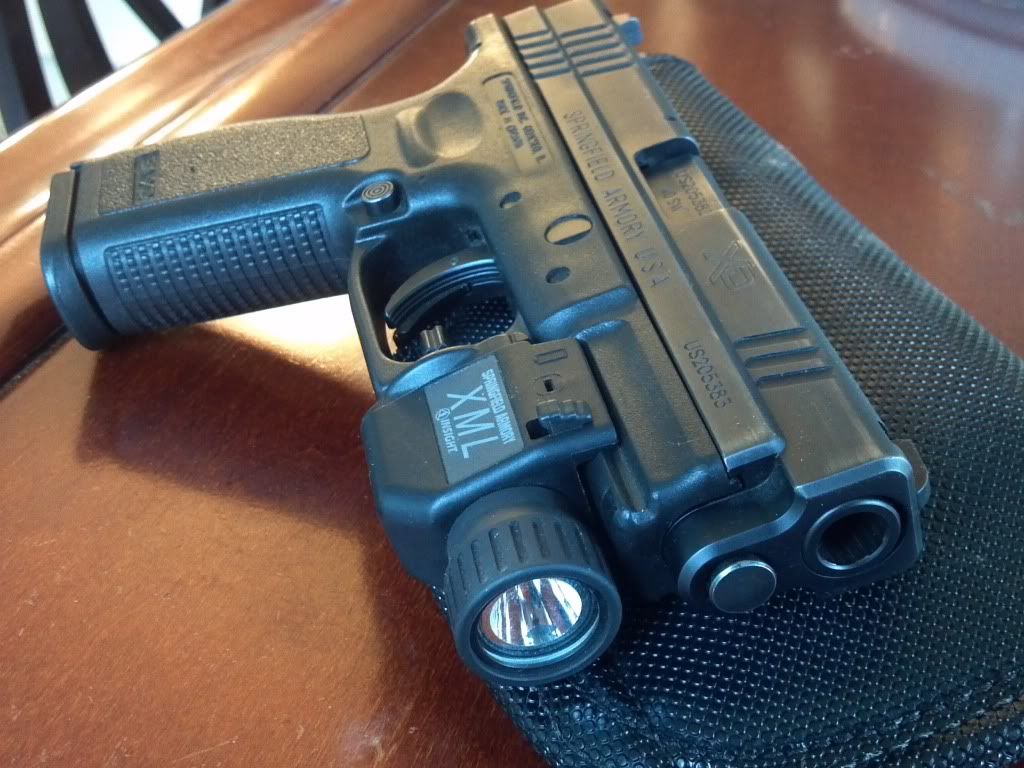
Wanted to do a quick review of my new pistol, the Springfield Operator. This pistol is one that I've wanted for quite awhile, but never could afford. It's part of Springfield's loaded series of 1911 pistols. This one in particular was co-designed by Springfield Armory and the US Marine corps. The idea behind this weapon is to take all the aspects of a highly accurate competition 1911 pistol and apply them a rugged, all steel 1911. The result is quite impressive, I never knew I could shoot this well.

A little background on the 1911. It was designed by John Browning and adopted by the US military in 1911. Being that it is still in use today, it is the longest running firearm used by any military in history. (Shotguns possibly being the exception to that, but that's more of a class than a model) The 1911 platform is widely agreed upon by most shooters as the greatest handgun ever made. With a manual safety and a grip safety it was also a very safe gun to carry. With the harder hitting .45 caliber round it was an obvious choice for military use. Even today we are seeing a move away from the 9mm cartridge by many military entities. Opting now for more specialty cartridges including .40 caliber, and using old standbys like the .45 caliber.

There are literally thousands of choices when it comes to a 1911 purchase. My reasoning behind this purchase was mostly due to reputation and brand loyalty. It also helps that this model comes Olive Drab. One thing that I knew I really wanted was an integrated accessory rail. This is not all that common in the 1911 world, but is starting gain some momentum. The ability to attach a light and laser is a great thing to have. The added weight of the frame also helps with recoil and muzzle rise, lending to faster follow up shots. Weighing in at 42 oz. it is a very heavy gun, but I kinda like that about it. They do have the lightweight operator, with an aluminum frame, which is much lighter at 32 oz. If the full steel frame is too heavy for you it would be a good option.

Some other standard features on this gun are Trijicon® night sights and a match trigger. Along with a Pacmayer® rubberized wraparound grip, and ambidextrous safety. The gun also comes with two magazines, a paddle holster, double mag holder, and a cleaning rod. Surprisingly the holster is great, I like it almost more than the DeSantis® leather one I purchased. When I purchased my Springfield XD a few years ago, the holster it came with was not so good. This one I will definitely get use out of. Just the two magazines is a plus, generally they only come with one. I guess for the price it should be expected, but they include two even with the lower end models.

Shooting this gun is by far the best time I've ever had shooting a pistol. The added weight makes the recoil completely manageable, and speed shooting is cake. This is a gun that even a novice shooter could stack bullets with. The large grip may make it tough for some, but with average to larger hands it's quite comfortable to shoot. The only downside I have noticed is that 7 rounds in the magazine goes quick. You really need to practice reloads.


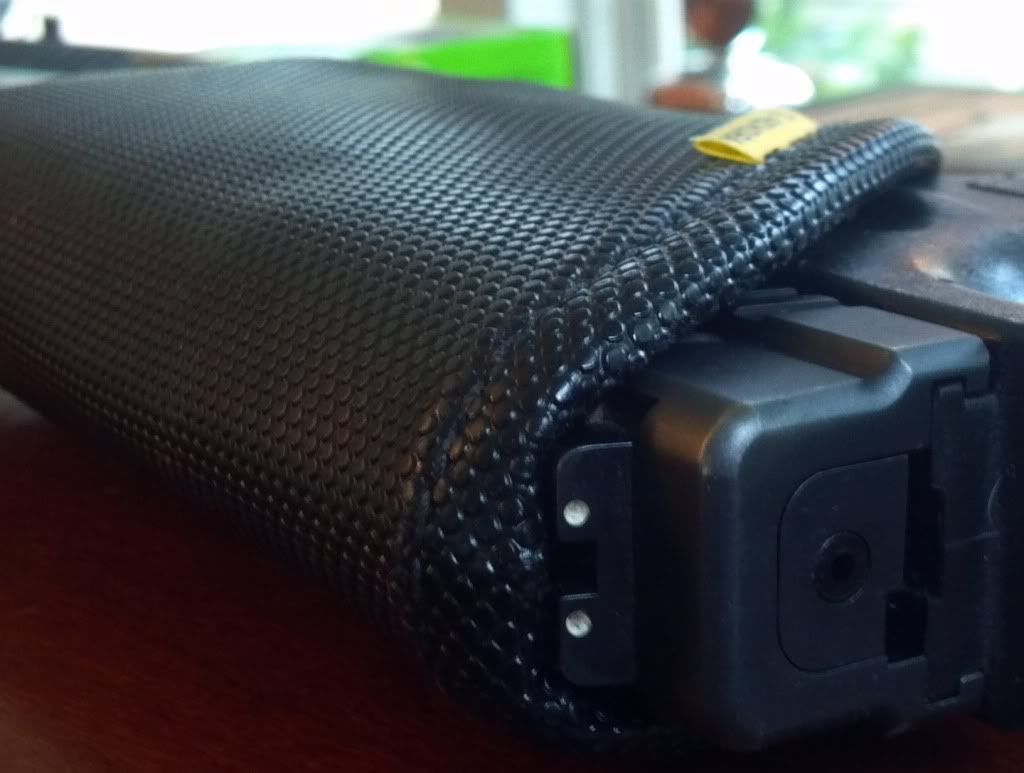
Being a New Yorker we have to deal with a ten round maximum in any magazine manufactured after 1994. So the seven round magazines arent that much less capacity, but I do prefer ten rounds whenever possible. It wouldn't seem like that three rounds would make much of a difference, but it does take some getting used to. Luckily when you order a loaded series 1911 from Springfield, they offer you a one time accessory order at cost. Which means ten round clips for 18 bucks each, nearly half price. The downside to these is they stick out quite a bit, not great for concealment. So they sit in my bag ready for a reload.

Its now been about a month since I picked up this pistol, and about five trips to the range. With about 500 rounds downrange it has performed flawlessly,  with one exception. The malfunction I kept having was an inability to unload the weapon with a round chambered, very scary situation. After a ton of trial and error, it turns out ammo was the culprit.  Hornady TAP +P specifically. It was actually too tall for my gun, causing the bullet to lodge in the barrel. I have never seen this happen before, the gun is rated for +P ammo, and the ammo is in spec, they just don't work. It all has to do with head spacing in the barrel. .45 automatics with closer tolerances will not accept this particular ammo, but it works fine in all the polymer pistols we tried at the gun shop. I am now running Hornady critical defense .45 auto in 165 grain.

Overall I am incredibly happy with this pistol, if you have the means I highly recommend you pick one up. If not, a more affordable option can be found in the range officer model from Springfield. All the real world benefits without all the bells and whistles.

Monday, August 13, 2012

Solar Battery Backup


This is a quick review of a solar powered backup battery I picked up. I wanted one of these so I could charge my iPod and phone while out on the trail. I got this one on Amazon for under 30 dollars. The reviews were mixed, but I figured for the price it was worth a shot. The specs are 3 hours to charge with the wall outlet, 5 hours via USB, and 6 hours will give a 50% charge in full sun. From what the manual says you can't get above a 50% charge with sunlight, but the solar aspect is more for topping off.

First impressions are as mixed as the reviews. The solar panel looks very well made, sturdy and scratch resistant. The rest on the other hand, not so much. It has the feel of one of those iPod knock offs you win at the boardwalk. But hey, it was only 30 bucks. It also has a state of charge indicator on the back and an led on a flexible stalk. I'm sure I will get of use out of the light.


For the first charge they recommend a full charge via wall outlet. So three hours later I gave it a try, it charges my iPod, success so far. Over the next few days I topped off my devices, and did two full charges on my phone. (had to recharge the backup twice) So far it delivers as advertised. I would probably get about ten full charges on my iPod Nano, and one and a half on my Droid with one full charge on the backup. This is going to be really great for battery sucking train rides to the city. I did attempt to charge an ipad, no luck there. It sucked the backup down to zero and barely reached 5% charged.


Today, with the backup totally dead, I left it in the sun from 9 am to around 2:30. As promised, it charged to 50%. Another hour later it was still there, so 50% does seem to be the max for solar charging. Not ideal, but it would certainly be enough to keep a phone running, and more than enough for an iPod. Overall I'm pretty happy with it. The downfall will certainly be durability. I really don't think this thing would survive even a mild drop. But for the price I can't complain. It will be perfect for commuting and for camping.

Saturday, July 7, 2012

Remora No Clip Holster

For those that carry, I'm sure you have had trouble finding that perfect holster. As far as I can tell, it doesn't exist. There are a few that come damn close, and Remora is one of those holsters. I have found over the last few years that you really do need a holster for every occasion, including the clothing being worn and the temperature outside. Are you headed somewhere that it won't be a big deal if you show a bit? Or will it be a major problem if your gun is showing? For me the big problem I always had was on the motorcycle. I was having so much trouble concealing my XD that I went out an bought a .38 for pocket carry.

At that time I was using an in IWB (in waistband) holster from Desantis. I dont want to knock that holster, it is incredibly comfortabe, and well made. The only problem is to carry on the hip you need to buy pants 1-2 sizes too big. To carry at the small of the back works well, but you cannot sit down as the gun sticks straight out. This holster was out of the question when riding the motorcycle as well for this reason. My second holster purchase for that gun was another Desantis, this one a leather outside the waistband. Another fine holster, but much harder to conceal. It can be hidden under a t-shirt, but there is a noticeable bulge. The average person wouldn't notice, but it is there. This holster is excellent for carry under a jacket or sweatshirt, but summer is here and that is not gonna work too well. The major downside I haven't mentioned yet is that I can't utilize any of my lights or lasers.

I have searched for years to find an IWB holster that will fit my gun with the light attached. There are many Kydex options for outside the waistband, but very few for IWB carry. I first heard of Remora from video reviews on Youtube, all of which were overwhelmingly positive. They have an interesting design, using a rubberized, grippy material for retention instead of clips. This allows you to place it in your waistband wherever you prefer and at any angle. It doesn't seem like it would be secure enough, but after the videos I saw I was sold. So I ordered one, amazingly it was only 35 dollars. Along with my order I inquired about 1911 holsters, as they didn't list a holster for the model I'm planning on buying.


I recieved an email from Alan (presumably the owner) within a day, thanking me for my order and my inquiry about the 1911 holster. He gave me the model number for the holster I would need, and told me to reference the email for a free mag holder for my trouble. I was amazed, it really was no trouble at all. So about 5 days later my XD holster arrived, with a personalized note from Alan. First impressions are very positive, high quality construction and nice look. I ordered the model to fit my XD 40 with a 4 inch barrel and light modification with the reinforced top. On my first try I actually had to put the holster in place before I buttoned up my jeans, it was that grippy. Once in place, it would not budge, draws nicely and had a good feel IWB. The only downside, my light didn't fit, The gun alone works just fine, but it was too tight with the light attached. I figured I must have ordered the wrong size, so I double check the part number. No luck, I ordered the right one and it doesn't fit. So I email them and used the holster without the light for the time being.

During daily carry it worked great, deep concealment even on the bike, and really secure. About two days later I recieve an email from Alan. He apologized for the problem and said it was most likely due to the reinforced top option. It stretches the material wider, making the clearance on the bottom smaller, only allowing the smallest of lights and lasers. He went on to apologize for the issue, and said he would send out a replacement that would work better. As far as the first one I got, he said to keep it in case I had a friend who could use it or I wanted to carry without my light. I was blown away by this, by far the best customer service I have recieved in a long time.

A few days later my replacement arrived, and it works great. The only downside is without the reinforced top, reholstering is a little tougher. A minor sacrifice to make for having my light at the ready. I suppose it's the draw that really counts anyway. I have carried with this holster for about a week straight and it has not so much as budged once. Draws cleanly and easily, and is very comfortable as I can put it wherever I want regardless of what I wear. The biggest surprise of all, was the 1911 holster included in the package. A free gift to make up for the inconvenience, what an amazing company. Now I really can't wait to get my 1911. Remora has certainly gained a customer for life.

http://remoraholsters.com/

Thursday, May 17, 2012

Wednesday, May 9, 2012

Retrieveable Ammunition

Guns are great survival tools, but they do have their drawbacks. They are loud, require cleaning, and use ammunition that cannot be retrieved after use. They are certainly a large part of my survival plan, but I'm planning for the long term. I would love to tell you that my attempts at building a bow went swimmingly, unfortunately this is not the case. If I were less proud I would post the video of my bow breaking on the first draw. Thankfully Cabela's still stands. 
 
I went with a Martin Jaguar three piece recurve. I didn't have any particular brand in mind but I wanted the three piece recurve because it can be broken down and put into a backpack. A compound bow or a crossbow would definitely be superior in accuracy and power, but this recurve is lighter and breaks down more easily. I also really wanted to build my skills without sights. After all, any improvised bow that I make will be without them. 
 
 
Overall it is a great bow, very reliable and simple to use. The only downside is the arrow rest it came with, a friend got me a much better one as a gift and it has made a huge difference in accuracy. With a 50 pound draw it can be a challenge for someone smaller but you can untwist the string a bit to lower the draw weight. ( thereby lowering the power as well ) It also has the ability to attach sights and a quiver should I choose to at some point. The entire bow breaks down to about 24" with an allen key, and fits easily in my pack.

Tuesday, May 1, 2012

Build a Smokehouse

    Smoking meat has been practiced for thousands of years as a way to preserve meat unrefrigerated for an extended period of time. It's also quite tasty. Now sure I could've just gone out and bought a smoker, but I like to improvise. My idea was to build a cold smoker, so that I could smoke cheese as well as meat. For this project you will need a wooden box of a fair size, a pipe at least six inches in diameter, a shovel, and a pot lid at least sixteen inches across. I'm using the lid off of my charcoal grill. The idea is to build a Dakota stove with a chimney leading into the wooden box. A Dakota stove is simply two holes with a tunnel dug between them. Build a fire in one and it will pull air through the tunnel. This is traditionally done so that a campfire cannot be seen from any distance away. Very important if you're trying to stay hidden in big sky country. The reason I'm using this method is that a smoke house is usually built into a hill, I do not have a hill.


     Start by cutting a hole in the bottom and top of the box, being sure that the one in the bottom is larger that the top. Save the cutout from the bottom and use it to cover the upper hole. Select the location for the smoker. Dig a hole a distance away matching the length of the pipe you have, dig a second smaller hole about a foot away from the main fire hole. Dig a tunnel towards the bottom of the hole about six inches in diameter between the two for the air inlet. Now dig a trench between the smoke house and the fire hole deep enough to bury the pipe. Bury the pipe under at least a few inches of dirt. (Place a branch on top to keep it from getting stepped on and crushed) The soil acts as a heat sink, cooling the smoke as it moves through the pipe. A cold smoke allows you to cure without cooking, important for sausages and cheese. If you do have a hill, dig out a fireplace and run the pipe just like a chimney up to the smokehouse. 


     When its all done start a roaring fire in the main hole with the lid off. Charcoal works best, but any dry hardwood works. Avoid soft woods like pine and cedar, they can deposit soot and some pretty nasty stuff, they will definitely ruin the meat. While you're waiting on the fire, soak hardwood chips in water, at least a half hour. Soaked chips produce more smoke and keep the fire from getting too hot. Any hardwood chips will work but some are better than others for flavor. I prefer hickory and apple, maple and oak give nice flavor as well. Chips can be purchased in the grilling section at the store or you can chop them yourself, if you have a wood chipper even better. For my last smoke I did a combo of store bought hickory and maple I chopped myself. By now the coals should be ready, hold your hand over the fire pit, if you can't count to five without pulling your hand away it's hot enough. Pile a big handful of wet chips in the middle of the coals and cover the fire hole. The chimney being on top and the air inlet on the bottom should make it draft easily, if you get smoke out of both holes try blowing in the air inlet. Adjust the opening on top of the box using the cover you cut out of the bottom. The idea is to keep as much smoke in, while still allowing the draft to work.
 
     For the inside of my smoker I use cooling racks that are normally used for baking, I also hang meat inside. For this BBQ im smoking slab bacon, one whole chicken and about ten drums. I smoked this batch for about four hours, adding chips and rotating the meat every hour. After the smoke, grill and add your favorite sauce.

Wednesday, April 25, 2012

Know your Plastics


Plastic is one of the most common items in the world. We make everything out of it, but not all plastics are created equal. Some are good, most are bad. If you turn over any plastic item it should have a recycling symbol with a number in it. Occasionally this number will not be there, unless it says PP in the symbol in place of a number it should be discarded. The number system identifies the type of plastic, PP denotes polypropylene, which is food safe. If there is no identification, assume the worst and throw it away. Plastic products are full of chemicals, many can leech into food and water, some simply deposit chemicals like BPA (Bis phenol-A) on everything they touch. Most of these chemicals are long term dangers, in a survival situation, use whatever you have to. In the case of prepping food and water for said survival situation, keep these things in mind. It is a good habit to be in, just in case the apocalypse never comes, it would be nice to live to a healthy old age. 


#1 PET (Polyethylene Terephthalate) Not food grade, avoid if possible.
Commonly used in soda bottles, water bottles, cooking oil containers. Should be avoided for anything other than water. They can leach antimony and phthalates. Not really any short term danger but not good for food storage, especially acidic contents.


#2 HDPE (High Density Polyethylene) Food grade, safe to use.
Commonly used in milk jugs, plastic bags, and garbage cans. This is the most common plastic you will find. It's widely used in the food service industry. Generally the big blue plastic barrels everyone uses for emergency water are made of this material as well.


#3 PVC (Polyvinyl Chloride, aka Vinyl): Not food grade, avoid if possible.
Commonly used in condiment bottles, shower curtains, Saran wrap, and toys.
Can leach lead and phthalates and other nasty chemicals. Can also release toxic gases when heated or exposed to chemicals.


#4 LDPE (Low Density Polyethylene): Food grade, safe to use.
Commonly used in grocery bags, food containers.


#5 PP (Polypropylene) Food grade, safe to use.
Commonly used in Gladware, water bottles and bottle caps.


#6 PS (Polystyrene, aka Styrofoam): Not safe, do not use.
Commonly used goddamn everywhere.
Can leach carcinogenic styrene and estrogenic alkylphenols. It's also about the worst thing for the environment on this list.


#7 Can be a variety of plastics, some are safe, most are not. If it doesn't specify, avoid.
PC (Polycarbonate) Avoid at all costs, it can leach Bis phenol-A (BPA). Also commonly used in thermal receipt tape so avoid that as well.
ABS (Acrylonitrile Butadiene Styrene), S. AN (Styrene Acrylonitrile), Acrylic, and Polyamide fall into this category too. They are safer, but not great. Some require a bit more research as well before I would trust them.

New plant-based, biodegradable plastics like PLA (Polylactic Acid) also fall into the #7 category and are food grade.

Sunday, April 15, 2012

Wild Onion Soup

Now that you've made your own stock, time to make soup! I did a post about this time last year titled "Food is everywhere" To revisit this concept we will be making wild onion soup. Wild onions are easily spotted about this time of year. Commonly called onion grass, they look quite like a small patch of tall grass. Once you notice them, you can't help but see them everywhere. Dig up the taller clumps and pull out the bigger bulbs. They really do grow like weeds so unless you have a lot of time on your hands don't bother with the smaller ones. In a survival situation they can be eaten right out of the ground, though caloric content is pretty low. The flavor is like a cross between a chive and a green onion. Gather a whole bunch and clean them thoroughly. Chop off the roots and remove the bulb just below where it begins to turn green.

Ingredients-

-2 cups wild onion bulbs, cleaned and sliced in half lengthwise
-6 cloves garlic, chopped
-1/3 of a stick of butter
-1 tablespoon rendered chicken fat (optional but recommended)
-6 cups chicken broth (or beef)
-1 cup white wine (red if using beef)
-4 ounces beer (pale ale for chicken, stout for beef)
-1 tablespoon flour, (Any type will do)
-Salt and pepper to taste
-2 tablespoons Herbs De Provance or preferred French herb blend
-Sliced Baguette
-Provolone cheese, sliced

Melt butter and chicken fat in a large pot, add onions. Wild onion takes awhile to soften, saute for about 15-20 minutes until they begin to brown. This is where the chicken fat makes a difference, butter may not brown them much. When the onions are almost done add the garlic. Sprinkle flour on top and cook for an additional two or three minutes to cook off the raw flour taste. Add the wine and beer and bring to boil. Simmer until all the liquid is gone then pour in broth. If using home made stock I like to pre-mix it but you can do it in the pot, start with 3 cups water and add stock till it tastes right. Add herbs, salt and pepper, simmer uncovered for an hour. Taste and add spice as needed.

Toast the sliced baguette till it's quite crispy. Fill an oven safe bowl with soup and float the bread on top, cover with cheese and broil until the cheese browns.


Wednesday, April 11, 2012

Homemade Stock

How often do you take those little cubes you put in your "home made" chicken soup for granted? Without the flavor that bullion cubes or canned chicken stock gives your soup, it comes out flat and boring. Kinda like boiled chicken with salt and garlic. Well the beauty of this post is that not only will it teach you to make your own stock, but it will teach you to be less wasteful. It also saves a ton of money. Throwing away this source of nutrition would be a big no no when you're trying to survive. You can make stock from the bones of any animal, though chicken and beef are the most common. For this one let's start with chicken, as the process is pretty similar either way. The basic idea is to boil bones low and slow to get all that tasty marrow out. Pretty easy right?

Ingredients-
-One dead chicken 
-Whatever vegetables you have in the fridge
-All drippings left over from cooking aforementioned dead chicken
-Salt

Start with a whole roaster chicken, prepare it however you like. If you're planning on making soup, roasting the whole chicken is best, save the drippings. Put the meat in the fridge or freezer to add to the soup after the stock is done. Butchering first is fine too, just save all the bones and skin. They can be frozen as well, I like to save up two or three chicken carcasses and boil them all at once. Add all the bones to a big stockpot or crockpot and cover with water. Now add everything else. I prefer the slow cooker method as it uses less energy but on the stove is just fine too. (next project will be the solar cooker) As far as vegetables, I like to make sure I at least have a half onion per chicken and a few cloves of garlic. The more stuff you use, the better the flavor. Celery, potatoes, leeks, scallions, and apples have all worked well for me. You can add spices if you'd like, bear in mind it will limit what you can do with the stock.

If using a slow cooker, put on low and simmer for a minimum of twelve hours. For stovetop, bring to boil and turn down to simmer for twelve hours as well. The longer it goes, the better. I prefer over 24 hours. After it's boiled for as long as you like, remove from heat and strain out all the solids. The veggies are great for the dog, but for the most part the rest is garbage. To be as thorough as possible I put aside the big bones and let them cool long enough to handle them. Break the bones in half and put them in a pot on the stove and add the stock. Add salt to taste, it should be very salty, maybe double what you would put in the same amount of soup. Boil the stock uncovered for an additional hour. This removes some of the water content and gets the last little bit out of the bones. Boiling it down really just saves space for storage, if you're going to be making soup soon you can skip this step. After the hour, remove the last of the bones and pour off the stock into a tall container. For one chicken a quart size container is usually perfect.

Refrigerate overnight. The next day you will see all the fat has separated from the stock underneath, skim off and save. Pictured left is a beef stock a friend made. The stock should have the consistency of gelatin, if it's still runny, boil it down some more. Distribute the stock out to smaller containers and store in the freezer. If done properly it can be canned as well. I haven't tried this yet so I won't speculate. I prefer pouring it into ice cube trays, one cube equals roughly two servings of soup depending on how concentrated you manage to get it. For the fat there is a multitude of uses. Chicken fat can be a substitute for butter in most recipes, pork and beef fat make great candles. (See previous post) I like to add it back in when I roast my chickens, it concentrates the flavor and you don't have to add oil or butter.

The reason your mom always made you chicken soup when you were sick is for all the health benefits of stock. Being made from bone marrow it gives an immune system boost. It also helps the the healing process along, especially in the case of a broken bone or joint injury.  These home remedies have gone by the wayside in recent years, hopefully things like this will make a comeback.

Wednesday, April 4, 2012

Pine pitch torch.

Dandelion Mead

This is a mead that I've been wanting to brew for the better part of a year, I just never seemed to get around to it. So today while wandering around outside the shop on my lunch, I noticed how many dandelions had flowered in the last day or so. In about twenty minutes I had enough picked for a one gallon batch. This is a good one for beginners due to the small amount. From what Ive read to make dandelion flower tea (You can make a tea from the leaves, but it is quite bitter) you need about eight flowers per twelve ounces of tea. One thing I have noticed about mead is that you lose quite a bit of flavor after racking, so I tend to make my teas much stronger for brewing. I used about 60 flowers, which is about six times as much needed for the average cup of this tea. Simply bring about a gallon of water to a boil and add the flowers. Remove from heat and cover. Allow to steep for and hour or so.

Once the tea is brewed, strain out the flowers using a mesh strainer. Add about half of the tea back into the pot, add two pounds of your favorite honey. For this batch I'm using Russel farms pure wild flower honey, from Rhinebeck NY. All honey, especially local stuff, has a different sugar content. This is why we start with half of the tea, it's much easier to add more tea than remove it. Add tea in small increments until the hydrometer* reads the desired potential. For this batch I'm looking for about 11% potential, hopefully ending in about two months at 1%, giving a total of 10% abv. If you don't have a hydrometer they can be picked up at any brewing supply store, or at Amazon for under ten dollars. If you want to make this before you get one, or society has broken down an you're unable to purchase one from Amazon, two pounds of honey makes roughly 10% potential in a gallon total of wort*. That's a gallon total, not adding to a gallon of water, so add the honey to a one gallon measure, then add the water. This should get you pretty close. This particular jar of honey gave me three quarts of wort at 12% potential. Once you've reached the desired sweetness, bring the mixture up to a rolling boil. This kills any wild yeasts or bacteria in the honey or water. While warming up, sanitize your fermenters.

There are several ways to sanitize. The most readily available is heat, simply fill the containers (in this case two 1/2 gallon growlers) with boiling hot water and cap them. This is similar to pasteurization, keeping the container above 160 degrees for about 10 minutes should kill anything inside. By far the easiest way is to buy a brewing disinfectant like Starsan, which I am using for this batch. A small amount of bleach mixed with water will work well, (about a capfull per gallon) but can leave some bad flavors behind. Disinfect a small piece of tinfoil as well to loosely cover the top. You cannot just cap it, IT WILL EXPLODE. Believe me, I've had it happen. I've found that with Mead you don't need to be quite as careful as with beer. Honey has natural disinfectant and antibacterial properties and gives you a little room for error, once your yeast is established theres little chance of something else taking hold. The traditional way to make mead by the way is to not disinfect at all and ferment openly, allowing the wild yeasts to penetrate the brew. I will be doing half in the traditional way and the other half using commercial brewing yeast. Which can also be picked up at a brewing supply or online. For mead I prefer Nottingham dry ale yeast.

Once your wort has boiled, remove from heat and pour off about eight ounces for a yeast starter. After the starter has cooled to about 90 degrees, add yeast to it. Allow the larger amount to cool to about 80-100 degrees before adding starter. By this time the starter should be foamy, this is how you know its ready. If it doesn't do anything, you put it in too hot or the yeast is too old. Pour in the starter and cover with the tinfoil tightly but don't secure it in any way. Once the CO2 has built up inside the jar it will push the foil out of the way and vent. This slight pressurization keeps foreign things from getting in. You can also use a commercial bubbler, but as I said, it's a little less likely that it will get contaminated so I don't generally use them anymore. Place the fermenter in a cool, dry, dark place. Make note of the date and alcohol potential. For the open fermentation, place it on a window sill in a container with a large opening on top. Cover with a cheesecloth to keep bugs out. For mine I will be using a large mason jar. After a few days you will see the wild yeast take hold. It will begin to bubble and froth on top. At this point move the jar to a similar cool, dry, dark place.

After about a month, check on your brews. At this point they should be around 5% potential, still way too sweet, but especially when experimenting I like to keep a close eye on it. With my spruce mead a gallon batch was done in 19 days so keep that in mind. At about 2% pour off a glass and chill it in the fridge. If its too sweet, let it go a little longer, if not, start racking. If you don't have a hydrometer, taste will be all you have to go on, it will take practice

Racking consists of chilling the mead so the solids drop out. My method generally is to refrigerate my fermenter down to about 35 degrees and to carefully pour off the mead without disturbing the sediment at the bottom. Do this three times and you will have shelf stable mead, but if you plan on refrigerating it can just be done once or twice. The danger of exploding bottles makes me worry about leaving my mead unrefrigerated. I have had success in the past though, just check them every few days for the first week, if there's no sediment forming in the bottom you got all the yeast out. Serve your mead chilled, somewhere between 45 and 60 degrees. All brews will be a little different depending on ingredients and sweetness, so serving temperature will vary.

Mead has truly become one of my favorite beverages. It's all natural, full of vitamins, and there's no hangover to deal with. Local honey also has really helped with my allergies as well. Three years ago I had such bad allergies I was medicated for two months every spring. Now I only have one attack a year when the trees bloom. All of these benefits and the satisfaction of getting a nice buzz on something you made yourself.

Hydrometer- A device that when floated in a mixture shows sugar content based on bouyancy.

Wort- Beer or mead before fermentation begins, basically a sweet liquid.

Tuesday, March 27, 2012

Lighting

One cannot stress enough how important light is. From the ability to make a torch in a survival situation, to how annoying it is when that weird sized bulb in the fridge goes out requiring a special trip to Home Depot. Since the discovery of fire, man has been scared of the dark. That may be hyperbole, but it's not far off. We light our homes, streets and parks. When those lights go out the average person can only rely on the light from their cell phone. It amazes me how completely unprepared most are for a simple power outage, much less a long term loss of power. 

My survival mantra is that I plan on my first three solutions to any problem failing, always have multiple backups. I have made entries in previous posts touching on the importance of a good flashlight. I normally carry three when its convenient enough, and worst case scenario, I have everything needed to make a torch and light it, as long as I can find a stick that is. At home I have even more redundancies, too many to list but they include many flashlights, weapon lights and improvised lighting made from automotive D/C systems. To outline a few can give you an idea of what you really need  to survive the night long term. 

The lights I carry with me everyday are two Streamlight Stylus Pro LED penlights, and a Mini Maglite LED.  I won't get too in depth as I have mentioned them in previous posts. Suffice to say they are very cheap, effective, and efficient. The Maglite also has a SOS/Flash setting that can come in handy for signaling. Unfortunately they both use standard AAA and AA batteries, this is not very sustainable. If the world really did end, they would be useless within a couple years. Even with rechargeable batteries, only a few years of use could be expected. For daily preparedness and survival on the other hand, they could be a life saver. 

 
At home in my affectionately named "Tactical Closet", I store my favorite light, a Streamlight Stinger LED rechargeable. These lights are literally bulletproof, aircraft Aluminum body, 180 lumen max output, three brightness settings and a strobe feature. The main reason I highly recommend this series of lights is that it can be charged via the wall outlet or in the car. I currently have a jump box (charged through a solar panel) charging my light. With a two hour continuous run time per charge I only need to plug it in one night a month or so with normal use. I also have the less expensive Xenon model that uses the same charger as well. Also a very solid light, but not as bright and lower run time. They also share batteries so I have one spare that I keep topped off.

Have you ever tried to make a torch? It's a good skill to have, and it's quite fun. A torch is made with a stick, an absorbent cloth, and any oily fuel source. Anything flammable will work, but oily fuels will last much longer. Simply wrap a cloth around a stick and tie it tightly, soak it in the fuel, and light. Do some experimentation to find the best fuels, I've found the best improvised fuel to be gun oil, but regular lamp oil works great if you have it. You can also make a torch from birch bark. Split a stick about about six inches and tie it off to keep it from splitting further. Fold pieces of birch bark and wedge them into the split. Light the torch, as it burns, slowly feed the folded bark up to provide oxygen to the bark. A properly made birch torch can burn for over 10 minutes. Not really a long time, but better than nothing. Make about thirty of them and you can at least make fire wood runs at night, or fend off an attack. 
 
Improvisation is important, not only does it save you money but it prepares you for a time when you can't just pick something up at the store. So I'm constantly keeping myself busy with little projects. Being a mechanic has given me many opportunities to pull apart  various vehicle lighting systems. My new favorite for improvised lighting are those little LED halo lights around headlights. If you pull apart the headlight, they can usually be separated into a string of 12v LEDs. These make super efficient lighting that can be run off of a car battery, and charged via solar or wind power. At a 50,000 hour life, LEDs like these are the key to long term lighting. If you can get your hands on sulfuric acid and lead, you can make your own batteries. Collect enough of these LEDS, and you can light your home for a lifetime.


Knot Tying: Seamanship: Knots, Bends, and Hitches pt1-2 1973 Dept of Def...

Saturday, March 24, 2012

Sterno Stove


A few moths ago I had a post about finding resources where others wouldn't think to look. My example was projector headlights for fire starting. The parabolic lens used to focus the headlight beam is also great at focusing the sun to start a fire. One other resource within that headlight is the trim ring that holds the lens in the housing. When totally broken down, this little piece of metal is the perfect size for a sterno stove. It's lightweight and durable. It almost seems like it was made for this purpose, the sizing and height are perfect. Simply place atop the sterno can, light, and cook away. Once you run out of fuel, make sure to save the can. Denatured alcohol, gasoline, or even something you distill yourself can be viable replacement fuels. 


Wednesday, March 7, 2012

Chia pets are edible!

Did you know that Chia seeds are edible? Very similar to Quinoa, they are rich in nutrients and high in protein. Chia seeds can be purchased in health food stores or in Chia pet form at random places all over. So when looting for food, don't forget to pop into the "As Seen on TV" store and grab a few of these. At least eating a Chia pet is a better alternative to eating your cat.

What will you do when your matches get wet?

So fire, duh. Very important, and I don't know about you but I haven't gotten friction fires down. So until that day I rely on modern tools. So of course I carry lighters and matches and the like, along with a firesteel. A very neat tool I'm sure you've seen Bear Grylles use, and his knife is where I got the idea for modifying my knife.

This flint is kept on my keys at all time, it can get wet and still produce a spark that's over 2000 degrees. Unfortunately the striker that it came with was junk, too small, and digs into your hand every time you used it. So I generally use my knife as a striker. The Bear Grylles knife has a surface on the back specifically for this purpose. So instead of buying a new knife, I just modified the one I have. Three seconds with a grinder and I have a perfect striker surface.

Saturday, March 3, 2012

Solar Cooking


In a survival situation or apocalyptic scenario, it doesn't make any sense to waste energy gathering wood when its warm out. So how can you cook your food without this enormous energy waste? Make yourself a solar cooker.

Solar cookers are generally made with a reflective material that reflects sunlight onto a dark colored cooking vessel. They can range from simple to incredibly complex. In this I'll lay out three very simple types, two of which are really easy to build at home.


The first is by far the easiest and most common type. It basically consists of a cardboard box lined with tin foil or mylar. Take a square cardboard box, and cut one along a corner from top to bottom. Line the entire inside of the box with tin foil. I use spray adhesive, but any glue you have will work. Angle the flaps at the top and front slightly inward, but not so much as to block light. Trim out the spaces on the bottom so that the lower flaps can be angled slightly upward. Make another flat piece to put the opened box on top of. Put a black crockpot in the center and face it south. Depending on cloud cover and temperature you can fully cook a chicken in about five hours. By periodically turning the box towards the sun throughout the day you can increase its efficiency.


The second type is a little more involved but very doable. First you need a satellite dish. Any size will work, the bigger it is, the faster it works. Just keep in mind that even a small dish can start a fire. For the reflective material you can use tin foil but Mylar is much better on curved surfaces. Cut your reflective material (in this case Mylar) into thin triangles. Spray the dish with adhesive and smoothly apply the Mylar, rubbing out air bubbles as you go. Spray the backs of the strips just before you apply them to ensure a smoother surface. Find the distance that the reflected sunlight is focused and place the pot at the focal point. This cooker boiled a pot of water in about a half hour.

If you want to tackle a large project, a water parabola is really neat. The basic design is a clear plastic sheet suspended above the cooking area, filled with water creating a parabola. Start by finding the heaviest clear plastic available. Cut a round hole in a piece of plywood and attach the sheet to the top, giving it a bit of slack. Build a frame to suspend it about 6-10 feet in the air and fill it with water. The weight of the water pulls down on the plastic forming a parabolic lens. Now find the focal point and make a table that is the proper height. Obviously don't use anything flammable. If you build it big enough you can fry an egg in seconds.

Using these and similar methods you can cook your food, pasteurize water, and even start a fire.

Here's a cool video from Green power science


Thursday, February 9, 2012

Shoelaces

Just a quick one, I can build a shelter with my shoelaces. Swap out your shoelaces with 550 cord. Not only will they last forever, but broken down you have 5 times the length of cordage to work with. 550 cord has several smaller strands inside a larger one, all together they can hold 550 pounds. (Hence the name) Its also commonly called paracord. With this resource you can fish, build a shelter or set snares. Could really be a lifesaver. I get mine through cheaperthandirt.com


Friday, February 3, 2012

It's not a purse, It's a "Survival Attache"

For years I was always saying, "If I could carry a purse I would". So why not? A messenger bag is perfectly acceptable nowadays as long as you're prepared for the occasional ribbing in the shop over it. I finally decided that I needed a bag about six months after I got my handgun license.

Now obviously my carry is on my person at all times, but reloads can be stored in my bag quite nicely. This combined with having a bottle of water on hand makes it a necessity for me now. Having all this extra room to carry things has made me feel way more at ease in almost any situation. Simply having pain killers and Benadryl on me puts my mind at ease, being that I have a bad ankle and a mushroom allergy.


The specifics of the kit are really up to you. The way I thought about it was as if I would be stuck in a room with no food or water for 24 hours. What medications might I need? How much water can I conceivably carry before it becomes a hindrance to daily activities? How bored would I get? Everybody has different needs in these areas so I won't get too specific on my kit, just a general picture.

First and foremost is water. As I mentioned in a previous post I love my Platypus flexible bottle. Holds one liter and weighs almost nothing. For food all I generally carry is a bag of peanuts and a small Ziploc of quinoa. I try to have a granola bar for some carbs but I tend to eat them fairly regularly so they're not a constant. A multi-tool, Mini Maglite and my survival bandanna can all be quite handy as well. Ammo is a big one for me in my selection of this bag. It has five pockets for handgun magazines and three for my rifle. (I don"t carry ammo for my rifle normally, and usually only have two magazines with me) My handgun light and pepper spray round out the self defense stuff.  My survival tin is also included. (Detailed in a previous post) For non-essential stuff I carry a journal, (for blog ideas mostly) my iPod, and charger. Various pens, a usb for my phone, and lip balm.

Sunday, January 22, 2012

Survival Eyewear

So I must admit that for the last several months I have been down to one pair of glasses. This is really against what preparedness is all about. So for my birthday a friend got me a pair of Wiley X PT-3 sunglasses. These glasses feature removable lenses that can be swapped out for clear or amber lenses. In addition to that, I ordered a prescription insert that clips above the nosepiece behind the safety rated lens. 


Overall a pretty rugged design, they are comfortable as well as functional. They ride a little higher than I'm used to from a pair of sunglasses, but when I sighted down my rifle I figured out why. The spacing below the lenses provide clearance for a good cheek weld on a buttstock. So I know that they will be great at the range, and that space reduces fogging as well while hiking or during any other physical activity. I am very much looking forward to wearing a darkened lens again, as I have gone without contacts for awhile and don't have dark prescription glasses. I'm hoping they will be good on the motorcycle as well, unfortunately it's been a bit cold to try it out. I did stick my head out the window while driving last night and the results seem promising.


My only complaint would be that it's kind of a pain to swap out the lenses, and it cannot be done quickly. For the most part I will probably be using the amber lenses in a day to day sense, so it will only be a minor annoyance. In a survival situation it would be strictly clear lenses I'm sure. While I was at it I figured I should probably have another backup, so I ordered an emergency backup pair of regular eyeglasses as well. Went to Greateyeglasses.com and got a decent pair for under 20 bucks delivered. You can't beat that, especially since they didn't even call to verify my prescription.

Saturday, January 7, 2012

Spruce tea mead 2

So just a quick update on the mead. It was done a mere 20 days after the the first post, and it's all gone due to the fact that it was very good. This has by far been the fastest mead I have ever brewed. My first thought was that the smaller quantity facilitated the process. Now I'm thinking it was the many vitamins found in the spruce tea. I brewed two half gallon batches at the same time, one with spruce and one with plain water. The regular one took an added two weeks, so it must be that spruce is excellent yeast food.

In short, this mead is great. It has amazing amount of flavor even considering the lower alcohol content. It would be on the sweet side by many opinions, but that's how I prefer it. It could probably go another day or two and dry out further. It has an almost minty smell to it, with juniper like spruce notes. After racking in the fridge for two days it cleared out considerably. Many of the spruce notes fell to the back and it was left with a clean, dry finish with a distinct medicinal quality. I am currently brewing another gallon today, with a heavier dose of spruce, hopefully the flavor will come out a bit more.

Thursday, January 5, 2012

Fun with Bacon Fat!

That's right everyone, save that precious bacon grease because we're making candles!

I can't really take credit for this idea, my friend at Immortal Potential sent me a link to this cool process. But I have wanted to do something like this ever since I read about tallow* candles in "My Side of the Mountain" when I was a kid.

The first step is to collect the grease. About three pounds of bacon will give enough fat to make a good sized candle when pan fried. Take fat and an equal amount of water and bring to a rolling boil. Remove from heat and pour in 1/4 of the total mixture's worth of cold water. Do not pour in cold water while it's boiling! This will result in skin grafts. When it's cool enough, pour into a container and refrigerate. 


While the mixture is setting up, gather your preferred candle vessel, string, a toothpick, a magnet, and a beer cap. For my string I used a waxed twine I got for my birthday from the aforementioned friend for just this purpose and a mason jar to hold my tallow. Punch two small holes close together on the bottle cap and thread the string through. Twist the string to create the wick. If your string isn't waxed you may have braid them. Drop the bottle cap in the jar and twist the top of the string around the toothpick at the top of the jar. Place the jar on top of the magnet. This will keep the cap from floating in the fat. Obviously the cap needs to be made of a ferrous metal for this to work. If you don't have a strong enough magnet you can use a small nut or even a rock.

Now check on your grease; by now it should be hardened up. Remove it from the water and blot it with a paper towel to remove any water. If there's any bacon bits on the bottom remove them while the tallow is still hard. Place the tallow in a glass measuring cup and place that in a pot of hot water. The fat will now return to a liquid state. Pour it into the jar being sure to get the wick wet as well. Place in the freezer until hardened. 

When it's all set up, cut the wick to about 1/8 of an inch from the top of the tallow. Light, and enjoy the mood lighting. (And in case you're worried, there is no bacon smell at all. I say boo to that.)

*Tallow is clarified at used to burn in a lamp or candle.