Monday, May 9, 2011

Water Purification and Procurement

This seems like it should be a no brainer to me, but I am constantly surprised at how little people think about something as important as water. Hopefully you have your disaster plan ready, with plenty of water stored up. Even if you do you need to plan to find it for yourself.


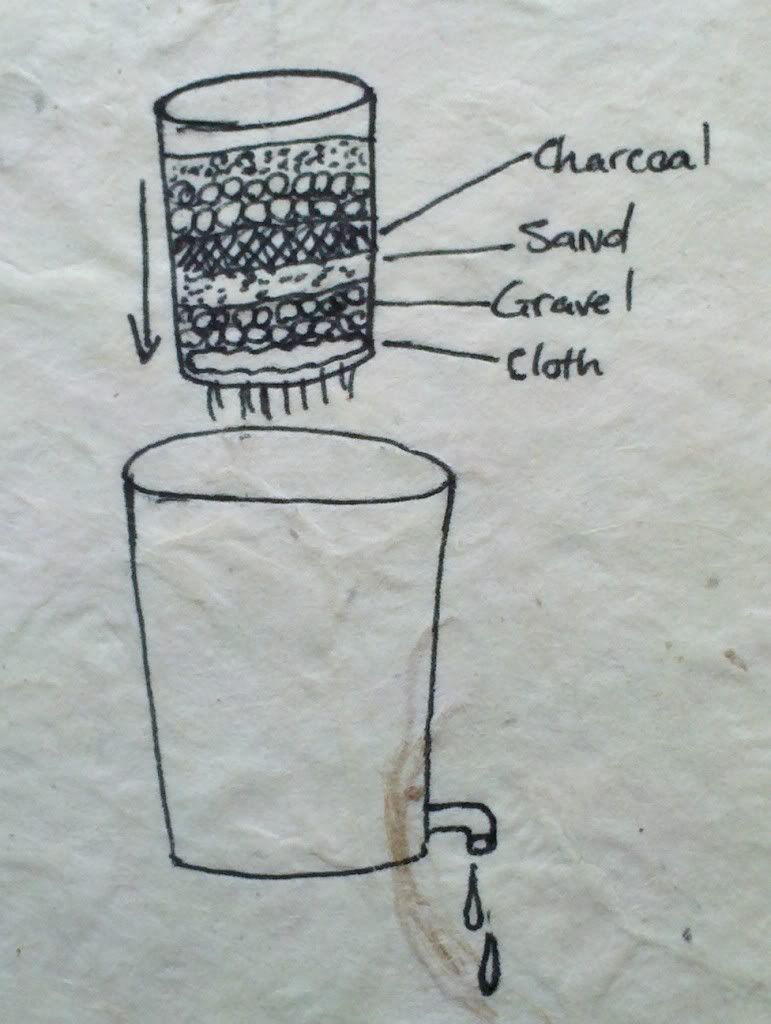
All questionable water needs to be filtered and sanitized, if you have any reason to think theres chemicals in the water, leave it be. No amount of improvised filtration is 100% effective. For heavy stuff like dirt you can make a filter out of cloth, or let it settle and skim off the top. For the stuff you cant see, like giardia and other pathogens, you need something a little more fine to filter through. Take a couple five gallon buckets, the stackable ones are best. Drill one hole near the bottom of one, and 20 or so in the bottom of the other. Take the bucket with the holes in the bottom and place a cloth at the bottom. Make layers of alternating gravel, sand and charcoal. Starting with the gravel on the bottom. place this bucket inside of the one that has the small hole drilled. this should give a couple inch gap at the bottom for the water to drip. Something similar to this can be improvised from almost any container.


Now to purify. Boiling is always best. It desroys all pathogens, and evaporates many chemicals. Bringing water to a rolling boil will nearly always make it safe to drink. Boiling can also be used to make salt water drinkable. By building a simple still you can catch the condensed water that boils off, while leaving the salt behind. This method is also effective if filtration isn't possible, as any dirt or debris would be left in the boil pot as well. The simplest of stills would be a plate or a piece of metal suspended over a pot of boiling water. Tip the plate down towards another container and the steam will condense and drip down. A simpler way of doing this is to throw your t-shirt over a pot of boiling water, let it absorb the steam and wring it out.

Pasteurization is a fairly reliable method as well, but I would only recommend it if you dont have anything to boil in. To pasteurize, heat the water to 160 degrees and maintain that temp for about a half hour. This should kill anything in there. You can do this in a plastic container by placing it near your fire and slowly bringing up the temperature.

You can also purify water with bleach, I wouldnt recommend doing this unless you had no other choice. Really it isn't much different than how your tap water is purified in many places. Take your water 1 gallon at a time and add 1 tablespoon of bleach at a time, mix and let sit for about 20 minutes. If the mixture begins to smell very slightly like bleach, you're done. Let it sit an additional hour, and drink. By this point the chlorine has killed off all the bacteria, and hopefully some of it has evaporated enough so that it tastes ok.


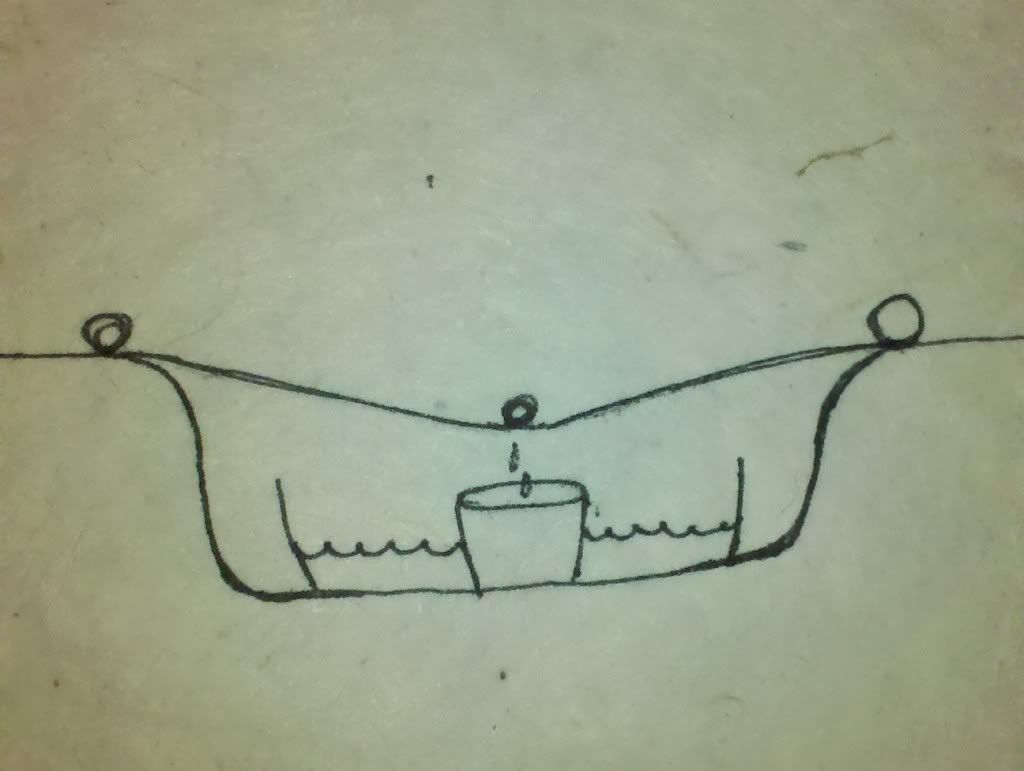
Solar stills are about the most effective, they require no energy to run, and once you're done building it, it doesn't require much work. Dig a hole a couple feet deep, and a few feet wide. (size depends on the containers you're using) Place a large, shallow container (or line the bottom with a black garbage bag) and fill it with your tainted water. Place a smaller container in the middle. (make sure it doesnt float) Cover the hole with a clear plastic bag. Line the edges with rocks to make it somewhat airtight, and place a small pebble in the center of the plastic above your cup. The sun heats the still like a greenhouse, the water evaporates and condenses on the cooler clear plastic. It then runs down the the low spot where you placed the pebble and drips into the cup. If you have a long piece of tubing you can place it in the cup and run it outside the still so you can drink without disturbing the plastic. This method is also effective for purifying urine if there is no water available.
Procurement can be a challenge in nature but there are tons of opportunities in an urban area. The easiest being your hot water heater. I touched on it in my last post. Simply shut off the water coming in, (there is most likely a valve at the top) and drain from the bottom. Simple as that, you dont even need to turn off the valve at the top onless you're worried about contaminated water in the taps. (for example in a widespread flood scenario or nuclear disaster)Another easy one is the toilet, by that I mean the tank at the top, not in the bowl. In a dire emergency you could use the water in the bowl, but it would need to be sanitized first.


Simple rain collection can be your best bet for long term survival. If you own a house, use your gutters, clean them well and the water should be good to drink as is. If you have a tarp available, use your imagination and build a collector.

Friday, April 1, 2011

Radiation protection

I've touched on this a few times in previous posts, but considering what's going on in Japan it seemed like something I should get into in depth. Now despite the fact that nobody believes it, you really shouldnt be worried about radiation from Japan. Radiation is very dangerous, but we're exposed to it every day. If I flew out to California today I would be exposed to more radiation at 30,000 feet than I ever would at a California beach. That being said, its at least good that people are thinking about this kinda thing now. I live north of Indian point nuclear facility, which has just been deemed as the most at risk plant in the US in an earthquake scenario. Weird right? Who would've thought that in New York.

The first thing you need to do is asses is your risk. If you live over 100 miles from a nuclear facility, you're not in much danger, but take prevailing winds into consideration. Radiation can travel hundred of miles under the right conditions. If you're not downwind and far enough away, your only radiation risk is from nuclear weapons.

In this day and age its not likely that we will face the detonation of a nuclear device on American soil, but we should consider the possibility. There is also the risk of a dirty bomb. I think these are a more likely scenario than tactical nukes, barring proliferation in countries like North Korea and Iran. If you live in an urban center, you should be prepared for a terrorist attack. A dirty bomb is not a nuclear explosion, but rather an improvised explosive packed with radioactive material. The purpose of which is to cause damage to the population through radiation sickness. This would damage a population far beyond what a normal explosive could accomplish. In many countries such as Iran, it probably wouldn't be very difficult to obtain these materials. In this scenario, a gas mask and iodine tablets are a necessity. You can purchase military surplus gas masks from cheaperthandirt.com for about ten bucks. Iosat radiation tablets can be bought from Amazon.com from many distributors. You may have some trouble finding them nowadays, I've heard most places are sold out.

The gas mask is not as much of a necessity in the meltdown scenario, as there is no explosion (nuclear or otherwise) to kick up radioactive dust and debris. But fires caused by a meltdown can cause clouds of irradiated ash and smoke. There is also the possibility of an attack on a nuclear facility. In case of a terrorist attack, you should hopefully have a plan already.

A few key things to know, radiation, gamma radiation specifically, radiates out in all directions from whatever particle its attached to, it does not turn corners. So the best place to shelter is in the basement of a building with at least two floors. The idea is to get as much material and space as possible between you and radioactive particles. If in a city, a central room at least two floors up and with two floors above should shield you from most radiation. If possible pile as much stuff between you and the outside as possible. For example, filing cabinets, mattresses, blankets, whatever you can find. Make sure to mark your shelter for search and rescue with the number of people inside. Do your best to make your shelter airtight, particles of dust and debris can carry radiation into your shelter. This is most important in the first couple of days. Most radiation will have dissapated to a safer level after three days, but in the case of a meltdown this isn't true. A power plant has so much material it will spew radiation for weeks. It is best to wait for rescue until you can't wait any longer.

If you have to leave, have a plan. Take into consideration wind and terrain. If the plant is in the west and the wind is blowing east, travel north or south out of the swath of radiation. You wont be able to outrun it going east. If you have no water you're going to need to get moving sooner. You can go three days without water, and three weeks without food. If you don't have water, don't eat, digestion uses up water. If you're out of water and there's little hope of rescue, get moving by the second day, if you wait too long you'll be too weak to move. So stock up on water, have at least a couple bottles in your car, in your desk at work, and have at least 10 gallons per person at home. Don't forget, your hot water heater has about 30 gallons or more in it. So at the start of the disaster, shut off the valve that supplies water in, and drain out the bottom. Make sure you have a battery or hand crank radio at home or in your car as well. Hope this helps out, and hopefully you wont need it.

Tuesday, January 18, 2011

Cold Weather Survival

PhotobucketThis post is mostly due to our last attempt at cold weather camping. It was fun, but theres a few things I would probably do different next time. The first time I went a few years ago was a complete disaster so I would consider this one a great success in comparison. The first one I think I would say we were a bit ambitious, and completely unprepared. We went out in 5 degree weather with nothing but a couple of Walmart sleeping bags, cheap bivy tents and a 12 pack of beer. What we learned is do not assume fire will be enough. That night ended in huddling around the fire and not sleeping a bit. It was decided that this time would be a best case scenario end of the world.
Photobucket
Pictured above is our campsite, obviously its a lot more than you could ever carry on your back. Also, I must admit we were lazy and brought all our wood. I figured the last time was such a nightmare, I wasn't taking any chances. So what we wanted to try was lean-to construction, nothing Bear Grylles would write home about, but I think we did fine. Next time I will definitely build them smaller. Mine was ok being that I had no air space at the back, but my friend Ryan had a hell of a draft all night. Im thinking a space blanket hung at the back would've helped.

Wednesday, October 13, 2010

Daily preparedness, part 3

This post is all about my bugout bag. I sorta have two, the first one being my tactical vest described in an earlier post. This one is the one I will more likely end up using. Ideally I would be at home when the shit hits the fan, as this is where my rifle and most of my gear is stored. The reality is that I'm out of the house a minimum of 50 hours a week, and that's if I only go to work. So I've decided to put together a more comprehensive bag for the Jeep. This is alot more involved than the survival tin, as its made with the idea of keeping you alive for about three days.

Start off by thinking,what's the bare minimum I would need for a weekend trip? Now going from there scale down the clothing and add food and water and you're pretty close. Make sure you consider things like medications, contact lenses, glasses etc. I wont get into all that sorta thing as everyone has different needs in those areas.

The basics aside from meds and toiletries I keep in my truck are as follows.
-Three days food and water, taking into acoount my girlfriend and the dog
-Basic first aid kit, be sure to include splints and trauma gear, I will get into first aid a little later, maybe my next post
-2 gas masks and spare filters (cheaperthandirt.com)
-7 day course Iosat radiation tablets for two
-50' paracord
-Cleaning kits for any firearms I may be carrying
-KA-BAR, I went with a tanto tip in black
-Multitool, I use a Colorado river Zillatool
-3a rated concealable body armor, not really a necessity but nice to have if things get really bad, check local laws on that one as well.
-MSR camp stove and three cans of fuel, Jetboil is a good brand too
-Minimum 2 flashlights, I use a maglight aa led, and a Streamlight Stinger led rechargeable (the Streamlight is cool because you can charge it through the cigarette lighter)
-Flint, matches, lighters
-Canteen and Steel canteen cup for boiling
-Iodine tablets for water purification
-Either a small tent or tarp for shelter in case you need to abandon the vehicle
-Collapsible shovel or entrenching tool, just a good idea to have in the car anyway
-1 pair of boots, decent hiking boots are a good idea
-Gas can, I just have a 2 gallon one for space but bigger is probably better
-I also recently added a small sterno stove and 6 cans of fuel in addition to my msr, this will mostly be for melting snow.


These are pretty much the basics, obviously your region and potential threats can change this kit drastically. Being that I live just north of the Indian point nuclear power plant I feel the iosat and gas masks are an absolute necessity, if you live in Canada lets say, warm clothing would be much more important.

Thursday, July 8, 2010

Daily Preparedness part 2


Survival Tin


This is something I got from the SAS Survival Guide. The idea is that you take this little tin with you wherever you go. Very easy to do if you get into the habit. I find its just easier to make one for each of your vehicles. This one is gonna go on my bike, and then next I'll make one for my girlfriends car. Start off with something like a tobacco tin, maybe 5 by 6 inches and a couple inches deep. I used the plastic case my handgun light came in.

-4 razor blades
-Pocket knife, lockback to save room
-Multitool, I went with a bit of a cheap one this time, it will get replaced eventually.
-Lighter
-Magnesium firestarter, will go with a standard flint, just gotta pick one up.
-Matches, waterproof strike anywhere are best, but you can dip regular wooden ones in wax to waterproof.
-Iodine tablets for water sterilization
-2 day course Iosat radiation tablets
-2 muscle relaxers
-2 percocets
-6 feet of paracord (broken down that's 96 feet of cordage)
-3 Fishhooks and a length of line
-3 Adhesive bandages
-6 Butterfly closures
-Ampule of iodine
-Thread and 3 needles of varying sizes
-Sreamlight LED keychain light


Obviously this wont be everything you'd ever need in any given situation, but sometimes even just a knife could be the difference between life and death. In my opinion a sharp knife and a flashlight are the most important things in a survival situation. A cell phone could be used as a light source if needed, but its just not gonna work as well as a penlight. You can go bigger or smaller with this kit, totally up to you.

In my next post I'll be descibing my bugout bag, and as always your suggestions are welcome.

"A good plan executed violently now is better than perfect plan executed next week" -George S. Patton

Monday, May 17, 2010

Daily preparedness

This post is all about being prepared at all times. Or at least as prepared as possible. There really is no way to be prepared for any situation that may arise 24 hours a day, but there's a lot of little things you can do to improve your chances. I'll start off with everything I carry on my person at all times, then in my next post, a description of my survival tin, and finally my go bag I keep in the car.

First and foremost, carry cash. I know that can be tough, being a young guy myself there's been plenty of times that my entire paycheck has been spent by Sunday. If there is some sort of disaster or major terrorist attack, you may not be able to use credit or debit cards. I'm not saying to carry around a thousand bucks or anything, but 100 is very feasible to carry around all the time.

Secondly, I carry a handgun. This is not for everyone I understand, but if you do choose to carry, do your research and do it legally. As I mentioned in the previous post I carry a Springfield Armory XD in .40 caliber. Great self defense gun, a little big for daily concealed carry, but I manage ok with it. It may be a good idea to go with at least a 4 inch barrel, as this helps accuracy and muzzle rise for follow up shots. I carry two extra clips, so with the magazine in the gun that gives me 31 rounds of hornady tap hollowpoints.

Carry a good knife or multitool, and make sure it's sharp. I carry a Colorado river knife and tool company (CRKT) lockback, great knife, retails about 60 bucks. Got mine at eastern mountain sports. The coolest feature is it has two locks so it can't fold up on you while you're using it. Another one I recommend is the zillatool from the same company.

Lighting, if you carry a handgun a railed light can be good if you can conceal it. I don't carry one all the time, but I always carry at least one penlight. Streamlight stylus pro led lights are my favorite, very bright and run forever on two aaa batteries. Streamlight also has some pretty cool keychain lights that are really bright and very cheap as well.

Cell phone, duh.

Wristwatch, if you go digital buy one with a compass. I prefer analog. To use an analog watch to tell direction point the hour hand at the sun, half way between there and 12 on the watch face points south. Check out Casio gshock

At least two forms of picture id, just a good idea.

Shoelaces, might sound silly but bear with me. I replaced all my shoelaces in all my boots and sneakers with 550 cord. This is a really heavy duty cord used for parachutes. Inside the main sleeve of the cord are 7 strands of smaller cord. So now at any given time I have over ten feet of cordage to build a shelter or whatever. You can get 100 feet through us cavalry for about 50 bucks.

Lastly I carry a Flint on my keychain. I know it would probably just be easier to carry a lighter, but at least the flint wont ever break and will even work soaking wet.

That's it for what I carry around all day, makes me wish it was socially acceptable for me to carry a purse.

Friday, September 18, 2009

Survival gear part 2, Guns!


Just a quick addition to the previous post, I have purchased gas masks and body armor and added them to my kit. The gas masks can be purhased through cheaperthandirt.com for about 10 bucks. I recommend the Finnish model as the filter is on the side so you can aim down your rifle sights. If you don't have a rifle, the cheaper one with the double filters works great. It also comes with a carrying bag which is pretty cool. As for the body armor, you're gonna need to check your local laws as to what you can buy, if at all. Most companies will not sell them to you unless you're military or law enforcement. Do not purchase a flack jacket! These are not body armor, they are strictly to minimize injuries from schrapnel.


Photobucket

I've decided to give guns their own separate post. Due to the fact that I could talk about them all day. My primary rifle is a Bushmaster M4, 16 inch barrel, New York legal version. Being a New Yorker I'm a bit more limited as to what I can own. This means that all my magazines are pre-ban (manufactured before the the 1994 federal assault weapons ban) otherwise I need to keep them under ten rounds. No collapsible stocks, no bayonet, and no grenade launchers. (Damn) The Bushmaster is basically a semi-auto version of the AR-15 that is used by the military. The only real difference on a civilian level between that and the M16 is barrel length. Many would argue that this rifle is unreliable, I disagree, at least it hasn't been since the late 60's. Many would also recommend the AK-47, due to the fact that it will fire no matter how dirty it is. This is a sound argument, but there is a reason the Ar-15 has a dust cover. With precision comes accuracy, but precision means very tight clearances. So if you cant keep your rifle clean, you cant trust an AR. I would say that if you want a budget assault rifle that will fire no matter what, go with the AK, but make sure you buy a quality version. This means a milled receiver, instead of stamped. Go with a Mac-90, Chinese manufacture, but if you have the cash, Russian is always best. I owned a Mac-90, it was fun to shoot but I could never get a grouping better than 2 feet at 100 yards. Also, with the bigger punch of the 762/39 round, you have to deal with the added weight of ammo. I will always prefer better accuracy, especially since as long as I take care of my rifle, it will always fire.


As for accessories, it is really to each his own, my gun is set up to run squarely within the 100 yard mark, as my eyesight doesn't allow for much else. For an apocalyptic scenario this will hopefully be enough. The main things you need first are an optic and backup iron sights. Most rifles come with iron sights right off the shelf. I use a solid sight in the front and a flip up in the rear. Got my flip up from midwest industries out of US Cavalry. My main optic is an Aimpoint Comp3 red dot. This is on par with military standards, the Comp4 is out, but it'll run you about 800 bucks. Many of the other things I use are really just a comfort thing, and are gonna take some trial and error.


-Forend grip, great for faster target acquisition and controls muzzle rise.


-Three point sling, the military standard for tactical slings. Some prefer the single point, I have used both, I prefer the three point.


-Cheek weld- improves cheek placement and eye relief on the stock. CAA makes a great one that holds batteries. Got mine through US Cavalry.


-Magnifier, not necessary if using a standard scope with magnification. Really helps with the red dots sights. I have a 5x from Mako, about 119$ from cheaper than dirt. Not the highest quality, but I mostly only use it for sighting in.
-Lighting, I use a light with a pressure swith from UTG. Pretty good quality, with a really low price.


-Bipod, mines a Harris. Not really a necessary accessory on an M4, but its really nice and stable. Mostly would stay in the pack in a survival situation.


-Railed Forend, I don't have one, I want one, but I really don't think I need it. Honestly it will be mostly for looks. You can get a gas block triple rail and a lower rail for your handgaurds for under 50 bucks. This will give you all the attachment points you really need.


-Camo, not really a necessity, but it looks damn cool. I did mine with tan, black and OD green. blending them together with a sponge.


I also carry a sidearm, this is my concealed carry pistol as well. A Springfield Armory XD in .40 caliber with a 4 inch barrel. Probably one of the best handguns on the market in many peoples opinion. It is a rugged polymer framed pistol that I think i've only had one malfunction with it in over 1000 rounds. It has a trigger safety as well as a grip safety. Making it incredibly safe without having to worry about a manual safety.


There really is no perfect setup, it really is all about personal preference. Just train with what you're gonna carry.